There is an update
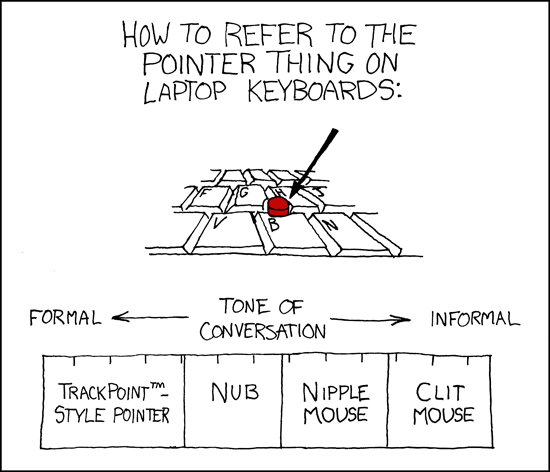
First the obligatory XKCD:
That’s what the keyboard looked like before, with the inspector checking it:

Disclaimer: This could have been made in a much finished way, but I decided to go only with materials I had on hand (because my “creative” criteria was to spend less than 24hrs on it).
Hardware
Salvaging the TrackPoints
First I needed one of those trackPoints. The good thing is that they are pretty much standardized on thinkpads and it is easy to find old thinkpad keyboards. A bit of unscrewing/drilling/breaking is necessary to separate the module from the keyboard, it was especially hard on the oldest keyboard.

Soldering the TrackPoint
DeskThority has a nice Wiki page on TrackPoint Pinouts.

Testing the TrackPoint
At this stage, I wanted to make sure everything was OK. So I made a small arduino program using Rampadc’s project. The streaming mode was not working though, playing with timings I started to get values that were somewhat decent, but with a lot of errors so I went back to a polling (called Remote) mode.

Finding some space inside the keyboard
Next I needed to find some place inside the keyboard. There is some room, and I don’t have a tiny microcontroller board for now (I’m eying those Trinket M0) so I have to run another cable outside. If you are doing that, just take a cheap hub, a trinket-like microcontroller and connect everything inside, that way you have only the original cable going out.
As I didn’t have access to a 3D printer that day, I needed to do everything with simple things (hot glue!!!). Some people are gluing sticks on the TrackPoints to have more space when needed (they use long piercings for example). But in my case I was never using that scroll wheel in the middle of the keyboard and it was the perfect spot so I decided to remove it and use that space.

The hardcore part, melting plastics with a gas torch
There were some ridges on the side of the scroll wheel and that made the thing not so practical. So I melted them using a gas torch (with a special end, so it is only hot air, not a flame). Super easy and fast, and much less messy than grinding/sanding it.

And that’s what I got after, the picture doesn’t show it that much, but it removed at least 3mm.

Reconstructing around the module
I inserted the module, and put it in position with hot glue. I then made some black epoxy using charcoal and two component epoxy. Just grind the charcoal in a fine powder or not, I decided to have a mixture of coarse and fine so it looks a bit more like the plastic of the keyboard. First mix the two components, then add the charcoal. My epoxy sets in 20 min, and in reality you just have 5 min to work it after that it is too elastic to shape it. I did not finish that part yet, because I wanted the module to be removable if anything went wrong. I’ll finish it once this first layer can be cured (usually 24hrs before sanding, if not it may be a bit gunky inside still).

Passing cables and making adapters
I only had a cable with 4 pins to go outside of the keyboard, so I decided to use the 5V from the keyboard itself, saving one cable. It is also possible to use a little RC circuit to get rid of the RESET, but I always prefer to have a real RESET on such devices.

I passed cables everywhere.

And I added temporary buttons as the only ones I have are large and noisy.
Final productotype
And that’s what it looks like. Of course it is not finished, I have to wait for the epoxy to fully cure before sanding it and finishing the shape around the TrackPoint (use oil so epoxy doesn’t stick to things you don’t want, silicone oil is the best but is impossible to remove if you did a mistake).
#
Software
Uinput
For the software part, I’m using Uinput a Linux kernel module. It allows for the emulation of input devices directly from user space. That’s the best way if you want your device to work in X11, Wayland, console…
You talk to the uinput system (you need to be root for that or have given the right, be careful, if you give the right to a user, they can type anything on the machine, so a program could well run commands for you):
    struct uinput_setup usetup;

    int fd = open("/dev/uinput", O_WRONLY | O_NONBLOCK);
    if (fd < 0) {
        fprintf(stderr, "failed to open device %s\n", strerror(errno));
        return 0;
    }
Then you declare what your device is and what it can do:
    ioctl(fd, UI_SET_EVBIT, EV_KEY); // We have buttons
    ioctl(fd, UI_SET_KEYBIT, BTN_LEFT);
    ioctl(fd, UI_SET_KEYBIT, BTN_MIDDLE);
    ioctl(fd, UI_SET_KEYBIT, BTN_RIGHT);

    ioctl(fd, UI_SET_EVBIT, EV_REL); // We have relative movements and two axis
    ioctl(fd, UI_SET_RELBIT, REL_X);
    ioctl(fd, UI_SET_RELBIT, REL_Y);

    memset(&usetup, 0, sizeof(usetup));
    usetup.id.bustype = BUS_USB;
    usetup.id.vendor = 0x1234; /* sample vendor */
    usetup.id.product = 0x5678; /* sample product */
    strcpy(usetup.name, "Bjo's nipple");
Sending commands, is as simple:
    emit(fd, EV_REL, REL_X, 5);
    emit(fd, EV_REL, REL_Y, 5);
    emit(fd, EV_SYN, SYN_REPORT, 0);
Arduino firmware
On the arduino, as I have to do polling, I don’t want to send values that didn’t change so I’m keeping the last message and only send the changes.
These are the messages it is sending:
| m | x (int) | y (int) | Movement relative of x and y |
| c | btn (int) | Click of btn | |
| r | btn (int) | Release of btn |
  TrackPoint::DataReport d = trackpoint.readData();
  if ((d.x!=0) ||  (d.y!=0)) {
    Serial.print("m ");
    Serial.print(d.x);
    Serial.print(" ");
    Serial.println(-d.y);
  }

  for (int btn=1;btn<4;btn++) {
    int pos = (1<<(btn-1));
    if (((d.state&pos) != 0) && (btnStatus&pos) == 0) {
      Serial.print("c ");
      Serial.println(btn);
      btnStatus = btnStatus | pos;
    }
    if (((d.state&pos) == 0) && (btnStatus&pos) != 0) {
      Serial.print("r ");
      Serial.println(btn);
      btnStatus = btnStatus & (0b1111 - pos);
    }
  }
I am also doing some kind of message handling so the computer can reset the module. These modules do their 0 when they are initialized, if you are touching it while it is initializing, then your zero is not right and you will have a drift.
    if (inputString == "WHO") {
      Serial.println("ME");
    } else if (inputString == "RESET") {
      Serial.println("OK");
      trackpoint.reset();
      trackpoint.setSensitivityFactor(0xb0);
      trackpoint.setRemoteMode();
      Serial.println("READY");
    }
And that’s the full sequende diagram we have for now:
Conclusion
That was a fun quick 24h project, having this uinput module really made things much easier.
These are the things left to do:
- Finish the polishing/gluing
- Try to make that stream mode work (clock signals are ok), I’ll need to bring my oscilloscope.
- Add a third button: for now we have two-button emulation, but that also mean I don’t have a nice scroll, and too bad I removed that scroll wheel ;)
- Buy a small board and integrate everything inside the keyboard.
Oh and keyboards are gross:
You can find the code at: GitHub Bjo’s nipple